Follow me on Pinterest

Showing posts with label Valentines Day. Show all posts

Sunday, January 12, 2014

Stamp Club review January 2014

 We had so much fun at our Stamp Club meeting last Thursday!  We started a new Term and I'm so happy to welcome back many "regulars" (who continually amaze and inspire ME) as well as some new members!  Welcome newbies!!

We got the term started off with 3 fun projects - nothing too overwhelming -  just great projects that are sure to be used, CASEd or "modified" and used for many occasions!
(CASE = Copy And Share Everything)

Valentine Treat:
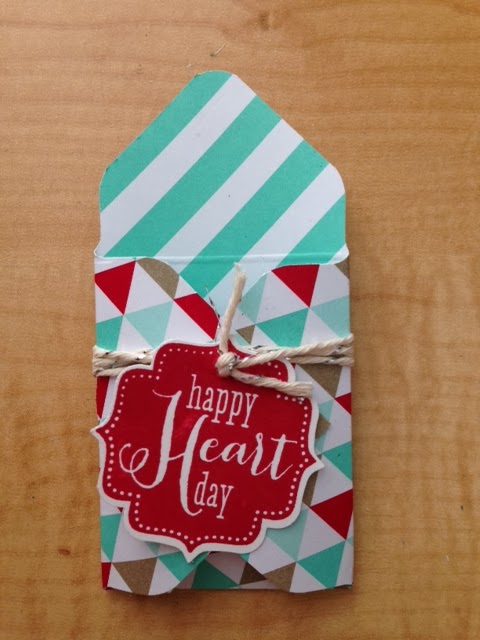
This simple but ADORABLE treat holder was made quickly by using the Envelope Punch Board.
The size is just right for the small Kit Kat bar (shown below) or the small Hershey Bar.  These are inexpensive candies that can found at Walmart and Target.
Supplies:  Envelope Punch Board  (item 133774); Fresh Prints Designer Series Paper Stack (item 132996); Bakers Twine silver (item 132976);  Tags 4 You (item 131823 Clear  / 131820 Wood); Label Bracket Punch (item 132153);  Real Red ink pad (item 126949); additional items - whisper white card stock scraps, small hole punch, adhesive.

Directions:  Start with a 4" x 4" piece of DSP. Using Envelope Punch Board (and normal process,for making envelopes - directions included with purchase) make first score line at 1 3/4" and punch the notch. Turn paper 1/4 turn and line up score line with Score Guide. Score and punch. Continue until all 4 sides are scored and punched. Use corner rounder to punch the top corner (as shown). Add adhesive to hold together as shown and then wrap Bakers Twine around about 3 times and secure tag with knot.  I used about 16" of Twine.

Next was a card using the Blossom Punch.  Instead of punching out a flower to use, we used the piece of card stock with the flower shape removed and revealing the DSP underneath....
Supplies: Blossom Punch (item 125603); Whisper White card stock and Daffodil Delight card stock scrap; Quatrefancy Specialty Designer Paper (item 130141); Daffodil Delight ink pad (item 126944);
1 1/4" Scallop Punch (item 127811); 7/8" Scallop Punch (item 129404); Four You stamp set (item 130538 Clear / 130535 Wood);Rhinestone jewels, Dimensionals, adhesive


We made the one in  Daffodil Delight but you can start with ANY color of DSP that you wish and match your ink to it.  Here it is in Strawberry Slush:


Project 3 was a Birthday Card featuring a stamp set called Really Good Greetings.  I love the sentiment that says "Finally, A day that really is all about You!".  This card has great texture and details! It's yummy!!
Supplies: Coastal Cabana card stock and Whisper White card stock. Strawberry Slush Chevron paper from the Designer Series Paper Stack In Colors (2013 - 2015)  (item 130136); Stamp sets: Really Good Greetings (item 130333 Clear / 130330 Wood) and Flower Shop (item 130942 Clear / 130939 Wood);  Pansy Punch (item 130698); Strawberry Slush ink pad (item 131178); Coastal Cabana ink pad (item 131175); Big Shot (item 113439) and the Perfect Polka Dots Embossing Folder (item 117335);  small scrap of Strawberry Slush card stock and the punch from Itty Bitty Shapes Punch Pack (item 118309);  Ruffle Stretch Trim in Coastal Cabana (item 130024); Pearl basic jewels (item119247) and Adhesive.  Not shown is the inside of card stamped in Coastal Cabana ink with the "Happy Birthday" from  Perfectly Penned (item 122892 Clear / 128703 Wood)

As always, if you have any questions about the projects, the materials, the directions etc. feel free to contact me.  Thanks for stopping by!


Thursday, January 20, 2011

Valentine Boxes

I am easily excited by delicious stamping and paper-crafting projects. But these Boxes made me go CRAZY!!!! You could make these for ANY occasion!  Here are my Valentine versions:


These are all made with the DSP called "Love Impressions"  (see Occasions Mini catalog) and various coordinating products like card stock, and ribbon in Real Red, Basic Gray, and Pink Pirouette. Jumbo eyelets in Pewter are set with the CropADile. And don't miss the fabulous Glimmer Paper (Red) that is so glitzy and beautiful - just like Dorothy's Ruby Red Slippers!!


I got the inspiration and  instructions from Sandy Hancock Udderly Awesome Stamping From the Heart who also gave credit to Rosemarie Diehl and Claudia Lapos. 
Feel free to check out their sites.  I will try to post a Box Tutorial very soon, to give you step by step instructions!

Valentine projects

Today is the day I can finally post some of the projects we made at Stamp Club last week!
First is the little "Kiss Card".  It's cute and fast.  It's also small, so it doesn't take a lot of card stock and could be used easily for a Valentine exchange. I did CASE this card, but unfortunately I don't remember where I saw it.  I was doing lots of web surfing and ran across it somewhere! Credit goes to someone out there who created the design!
Here is a view of the inside...

Base of card measures 3" square when folded. I used whisper white card stock for base. There is an Early Espresso strip (punched with Eyelet Border Punch) attached at bottom front of card. It's hard to see in my first photo, but when you view the opened card, you can see it.  The DSP on the front is from the "Love Patterns" package that is available in the Filled With Love Promotion (see sidebar / good through January 24 only).  The "love" stamp as well as the stamps on inside of card are from the set called "Filled With Love" which is also part of the promotion. Real Red stampin' ink was used for all images.

The center of the "O"  was punched out with a 1" circle punch. This allows the Hershey's Kiss to fit through. To finish, a knot was tied using Real Red 5/8" Satin Ribbon. 

The other card we made at Stamp Club is this cute Cupcake Card.  It is a birthday card, that definitely reflects a Valentine theme because of the colors.  But trade out the color scheme and the DSP for something else and you can get an entirely different look!

Base of card measures 4" x 4" when folded.  The DSP is "Love Patterns" from the Filled With Love Promotion. Punches used include: 2" x 1 3/8" Oval XL, Word Window, Scallop Trim Border, Scallop Edge Border and the NEW Build A Cupcake punch! Words are stamped in Early Espresso stampin' ink and are from the NEW set "Create A Cupcake" (see Occasions Mini Catalog).

I used some DSP from Designer Series Paper Stack "Neutrals"(page 175 in catalog) for the cupcake paper - I think it's perfect!  The frosting is punched Shimmery White card stock (page 170). I've often used Shimmery White for snowy, winter-type cards. But used here for the frosting, gives it a delicious little sheen!!

Embellishments make this card!  The ribbon is our scrumptious 5/8" Organza Ribbon (page 190). It is attached with Sticky Strip and sort of "bunched" or "pleated" as it was attached at left side of card.  Very simple. Very effective!  Of course, I love a bit of Bling - so the Basic Rhinestone Jewels were my choice at the top of the Whisper White oval.

Also not mentioned:  Pretty In Pink card stock (strip across middle, under the ribbon).
Real Red card stock for the cherry (punched with Build a Cupcake Punch)
Stampin' Dimensionals (to raise the frosting)
SNAIL Adhesive for other paper to paper adhering.

Thanks for stopping by!
Julie

Tuesday, December 28, 2010

Cootie Catcher Gift Basket

We used to call these little folded-paper toys "Cootie Catchers".  But you will see in this video, that they call them a "fortune teller".  Whatever name you want to use, this little project is soooo cute and would be ideal for a little party favor, a treat for a friend, or a hands-on project for your Workshops (for you demonstrators out there). Besides a Valentines Day project, simply change the DSP (Designer Series Paper) and you can use for ANY party or occasion!!

Ready, Set, Create!  I am offering a "$5 off coupon" (to use on your next Stampin' Up! order*) to the first person who sends me a photo of your completed "Cootie Catcher Gift Basket".  Please use current Stampin' Up product, and Email your photo to me. I will publish the photo and the name of the winner, here on my blog.

Julie

(*order must be $25 or greater before tax and shipping. Not valid on regular monthly Stamp Club orders.)

Filled With Love Promotion

Please click on the "Filled With Love" Promotion on the left side bar of my Blog! (just scroll down a bit till you see it)
I just ordered mine!  You can get the wood mount or the clear mount set.
To order - visit my  Online Store or send me an Email.