Follow me on Pinterest

Thursday, December 13, 2012

Friday, October 26, 2012

Stamp Club October 11, 2012


We had lots of fun with texture on this cute Christmas card (sent to me by Dee Hunt):
(sorry - my sample fell on a red ink pad during Club, so it has a smudge on it). 
Early Espresso card stock base. Real Red card stock (Scallop Square Bigz die). Old Olive card stock (Vintage Wallpaper textured impressions folder). Tree made from Pennant Punch (old olive card stock and old olive DSP).  Small scrap of DSP in Real Red. Small piece of Scallop Dots Ribbon in Chocolate Chip but coordinates just fine with Early Espresso card stock).  The Pennant Parade stamp set was used for the tree topper and the tree base.

This is a super easy-to-duplicate project (you could really make these for your Thanksgiving table!!)
Napkin Rings:
 Day of Gratitude stamp set. Early Espresso ink pad. Cajun Craze, Wild Wasabi, More Mustard and Very Vanilla card stock. The sentiment is punched with the Decorative Label punch. Note on one of the rings, there is an additional layer punched with a retired punch. (So sad).  But it actually is fine without it.

We made the Cupcake pick (with Gingerbread man) at Club, but I wanted to show you the Candy Corn cupcake picks I made for my own use.  That one was another cute idea from Dee Hunt - thanks Dee! 
Gingerbread Man cupcake pick:  Chocolate Chip ink pad.  Whisper White, Gumball Green and Real Red card stock.  1" circle punch, 1 1/4" circle punch, Scallop Circle Punch. Heavy duty, "elegant" toothpicks found at Target.

Candy Corn cupcake pick: Pennant Punch, 2 3/8" Scallop Circle, 1 3/4" circle punch. Basic Black, Whisper White, Garden Green card stock. The candy corn is made from Polka dot Parade DSP.  The small "boo" tag is from Tiny Tags stamp set and Little Labels Punch Pack.
Now I guess I should go make my Halloween cupcakes!

We also made the Pumpkin treat holder (holds 1 Hershey's Nugget) pictured here on the right:

The ghost and bat are mine from a previous Halloween - maybe 2 years ago?  Here are photos of those little cuties!!

The mummy, ghost and pumpkin are the easiest ones to make.  The base of the treat holder is made with 2 pieces punched from Petal Card Double punch.  Have fun!!


Saturday, September 29, 2012

Jumbo Sticky Rounds


As you saw in my last post, we created a beautiful embellishment for the front of our little Christmas treat box.  The base of the embellishment (under the paper rosette) was created using the new Scalloped Tulle found in the Holiday catalog. To make it super easy, we used Jumbo Sticky Rounds to create this.  See below for 1 option of how to build your embellishment:
 1. Separate 1 Sticky Round from the sheet (of 6).


2. Peel apart the layers.  Lay sticky-side up on your work surface. (Sticky part may stay attached to the pink part OR the clear part.  It doesn't matter. In this photo, mine stayed attached to the pink part.)
3. Using 12" of Scalloped Tulle, begin to gather the tulle and press down onto the Sticky Round as shown:
4. Continue working around the Sticky Circle, using all of your length of tulle.
5. If desired, add additional layers on top (like a paper rosette, button and rhinestone as we did at Stamp Club). Then simply peel the backing off the entire embellishment and stick onto your project!  Easy!!

Tuesday, September 25, 2012

Stamp Club projects from September 13

At Stamp Club we began projects for the holidays.  First project is this super simple halloween card:
The stamp set featured is found in the Holiday Catalog. It's called Toxic Treats. We stamped the witch image, using Basic Black ink, onto Very Vanilla card stock and cut the shape with Framelits: Labels Collection.  The Basic Gray piece is also cut with the same, but one size larger. The paper is Howlstooth & Scaringbone DSP (Holiday catalog).  The card base is Basic Black card stock that has been run through the Big Shot, using the Fancy Fan Folder. Great texture!! My sample is finished with some retired black lace ribbon, but the 1/2" Striped Satin Ribbon (black or gray) in the Holiday catalog would make a perfect choice! This card was super fast and easy. It's a great template to use for other cards too.

The next project is this charming card featuring the new Perfectly Preserved stamp set and Framelits: Cannery Set.
This card was CASED from another stamper while I was web-surfing.  Note how cute the lid is! We cut the lid using the Framelits and tied Bakers Twine (Cherry Cobbler) around it. So cute! Other elements are the Crumb Cake card stock layer that was run through the Big Shot with the Square Lattice Folder (a favorite of mine), The Cherry Cobbler card stock layer that was punched with the Scallop Trim Border punch, the Orchard Harvest DSPFramelits: Bitty Banners, and a button accent to finish it all.  Base of card is Early Espresso card stock.

And finally we forced ourselves to start thinking about Christmas.  The treat-box we made was CASED from Patty Bennett with small adjustments made for the materials I had on hand.
My box started as a piece of Gumball Green card stock, measuring 4 1/4" x 10 1/2". Be of Good Cheer DSP pieces measure 2 3/4" x 3" (2) and 1 3/4" x 3" (2).  There is a strip for the rosette measuring 1"x 12".
All pieces are pictured here:
 The box is made by scoring the card stock at 3", 5", 8" and 10" as shown:
Then turn the card stock and score at 1" as shown:
Snip the bottom edge up to where the score lines intersect, and you can completely remove the small rectangle at the corner:
Assemble box using Sticky Strip.
The rest is easy to copy from the photos, with exception to the Rosette.  I will post the directions for the Rosette. soon.

Happy Stamping!


Monday, August 13, 2012

Stamp Club August 2012


Here are 3 projects that we made last week at Stamp Club!
This cute card* is made with the Summer Silhouettes stamp set which is becoming a huge favorite! The border on the Calypso Coral cardstock is made using the Framed Tulips Folder (for Big Shot).
DSP (retired) in a Wisteria Wonder pattern, and the Wisteria Wonder Ruffled Ribbon make it pop!
Colors: Calypso Coral, Wisteria Wonder, Lucky Limeade.

*summer silhouettes card layout was CASED from another site and then altered to suit.

It's not too early for Halloween projects!  It will be here before you know it.
This card features the Bootiful Occasions stamp set. Note the little piece of patterned paper from Howlstooth & Herringbone DSP! The Basic Gray card stock base has vertical stripes for texture (Stripes Folder for Big Shot) and the black cut out behind the boot is made with Labels Collection Framelits (for Big Shot) and added texture from Vintage Wallpaper Folder (Big Shot).  A knotted piece of 1/4" Stitched grosgrain ribbon in Basic Gray is attached with some Sticky Strip. Finally the boot is embellished with Rhinestone Basic Jewels for a little *Bling*.
Colors: Basic Black, Pumpkin Pie, Basic Gray, Whisper White card stock


A Halloween basket is simple using the Simply Scored tool. My basket is made with Eggplant Envy card stock, Eggplant Envy DSP and features the new Googly Ghouls stamp set. Of course the goolie eyes are a must! Instructions for Basket are below, shown on a piece of Basic Black card stock.


Card stock measures 8 1/2" x 7 1/2".  Lay cardstock lengthwise on Simply Scored and score at 1", 2", 3" 5 1/2", 6 1/2" and 7 1/2" as shown:


Then turn 1/4 turn and score at 2 1/2" and 5" as shown:

 With scissors -Snip all the little strips up to the score line that they intersect as shown:


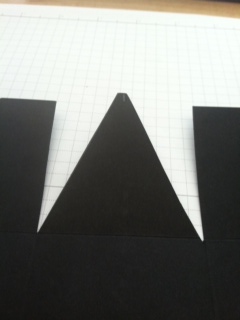
Find the center of the larger section and mark with pencil. Next draw lines from the top corner of that section, down to your center mark (just outside of mark is better):


You will do that same step on the opposite side as well.  And then remove the triangle portions that you've marked (4 in all):


Now assemble the sides: keep the triangle portion on the outside of the basket and gather up the sides alternating right/left/right/left until they are all gathered behind the triangle as shown:


 At this point you can use staples to secure it.  Or if you prefer you can punch holes and run a brad through it.  We added a handle (1" wide card stock plus a 3/4" strip of DSP for decoration).  Assembly was completely done with staples because the little witch covers staples on one side, and strategic placement of handle and staples finishes the other side.


Thanks for stopping by.  Happy Stamping!


Thursday, July 12, 2012

It's my Birthday!!

Today is my birthday!  It has been so fun having Stamp Club on my birthday!  It's like  having a party where all your friends come and stamp!  Thank you for all the wonderful wishes.  I am blessed having you in my life.
Below are the 3 samples from club this month (July).
First up:  A Birthday favor - for everyone to make and take home!  This is made with Crumb Cake, Early Espresso and Gumball Green ink. Stamp sets: It's A Wrap Occasions, and Create a Cupcake.  Extras include International Bazaar DSP and Word Window punch and Cupcake Builder punch.
Next is a card with the new Summer Silhouettes stamp set.  I'm quite sure that I CASED this from someone - not my original design.  I love the Raspberry Ripple (new In Color) ink and the new stitched grosgrain ribbon in Daffodil Delight!

Lastly is this very happy-feeling card. Calypso Coral, Gumball Green and Basic Black ink. Stamp sets: Betsy's Blossoms and Made for You. The little piece of DSP is from Summer Smooches and the card stock is Whisper White, Calypso Coral and Daffodil Delight. Extras include Dotted Scallop Ribbon Border, Designer Buttons (misc), Calypso Coral Baker's Twine and of course some rhinestone bling!! This card was also CASED from another source.
Thanks again for stopping by on my birthday! Hugs!!
Julie
I finally re-made the card sample from June Stamp Club (the one that Kozmo was chewing on).  Here it is!  Made with the new Summer Silhouettes stamp set (love it!) and also some new In Color colors including Gumball Green, Midnight Muse and Summer Starfruit.
Thanks for your patience!

Wednesday, May 16, 2012

Projects from Stamp Club

These are the 3 projects we made in Stamp Club this month.
The first card made in neutrals colors of Crumb Cake, Early Espresso and Very Vanilla was made with the Mixed Bunch stamp set (featured in Occasions Mini Catalog but still available) and the coordinating Blossom Punch.  Gotta love these!! (looks better in person - I'm no photographer!)
Crumb Cake seam binding, and Framed Tulips also noteworthy!

This second card, made in Daffodil Delight, Island Indigo, Rich Razzleberry, Real Red, and Lucky Limeade features a set that is coming in the new catalog called: Bright Blossoms and has a coordinating DSP called  Summer Smooches.

"thank you" stamp is from Teeny Tiny Wishes

Our third project was this Oh-So-Darling Purse!! Credit to Sandy Hancock for sending me a sample of this.  The Top Note die (for Big Shot) is used and most of the scoring can be done on the Simply Scored tool and the Diagonal Plate. Start with 12x12 card stock for this size. 
Melon Mambo / Wisteria Wonder
can hold several small treats or gift cards easily

Velcro dot allows repeated opening and closing
Please contact me if you have any questions about any of these projects or Stampin' Up! products!
Julie

Monday, May 14, 2012

Sale! Up to 80% off Stamp Sets!!

Stamp sets up to 80% off!! It's true, I am having a HUGE SALE!

Call it Spring Fever or whatever you like...but the time has come to clear out again and make room for the many new and wonderful sets that are being unveiled next month in the 2012-2013 Stampin' Up Catalog!!

Smaller sets are $5 each.  Larger sets are $10/$15 each.  But to make things easier...
All sets are $5 when you buy 4 sets! That's 4 sets for $20!! 
I am selling over 50 Stamp Sets!! (wood and clear mount)
I also have a large box of stamps for $1 each!!

NOTE: Not all sets are pictured. I have more sets that won't retire until the end of this month, so I am not free to advertise or sell those yet.  Please ask me about these sets.

Starting today, you can shop from your computer/phone! Check out the photos below and email or text me what sets you want to buy and I will put them aside for you until Saturday  (or another day this week). Anything left over will be available for viewing and for sale this Saturday May 19 from 4:00 - 7:00pm only. 

For ease in identifying: Sets are numbered Top Left to Right Top and Bottom Left to Right.
Need to see something more clear? Text/email me and I will send a close-up photo to you.

 
sold, sold, sold, sold

Sold, sold, sold, sold
Sold, Sold, Sold, Sold


Sets 13, Sold, sold, 16


 sold, 18, 19, Sold, Sold

Sets 22, Sold, 24, Sold


Sold, Sold, 28, 29


Sold, sold, Sold, 33


Sets 34, 35, sold, sold, 38
Sold,40, sold, sold ,sold,SOLD


$1 Each


Tuesday, May 1, 2012

Cheery Card for a gloomy day

We've got a bit of early "June Gloom" in southern California today. Not sure if the sun is gonna break through the the heavy marine layer or not...
So here is a cherry little card to brighten up the day!

Made with the new Bright Blossoms stamp set (will be available next month in the new catalog), along with the coordinating Designer Series Paper.  Also featured is the oval frame from Designer Frames (a Textured Embossing Folder set of 2) for Big Shot. Notice the delicate lattice impression on the Top Note?  This was created in a SNAP with the new Simple Scored Diagonal Plate!

Thanks for stopping by!