Follow me on Pinterest

Sunday, January 12, 2014

Stamp Club review January 2014

 We had so much fun at our Stamp Club meeting last Thursday!  We started a new Term and I'm so happy to welcome back many "regulars" (who continually amaze and inspire ME) as well as some new members!  Welcome newbies!!

We got the term started off with 3 fun projects - nothing too overwhelming -  just great projects that are sure to be used, CASEd or "modified" and used for many occasions!
(CASE = Copy And Share Everything)

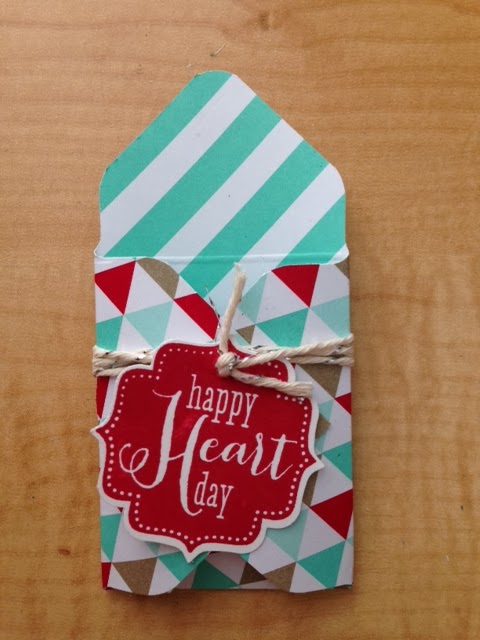
Valentine Treat:
This simple but ADORABLE treat holder was made quickly by using the Envelope Punch Board.
The size is just right for the small Kit Kat bar (shown below) or the small Hershey Bar.  These are inexpensive candies that can found at Walmart and Target.
Supplies:  Envelope Punch Board  (item 133774); Fresh Prints Designer Series Paper Stack (item 132996); Bakers Twine silver (item 132976);  Tags 4 You (item 131823 Clear  / 131820 Wood); Label Bracket Punch (item 132153);  Real Red ink pad (item 126949); additional items - whisper white card stock scraps, small hole punch, adhesive.

Directions:  Start with a 4" x 4" piece of DSP. Using Envelope Punch Board (and normal process,for making envelopes - directions included with purchase) make first score line at 1 3/4" and punch the notch. Turn paper 1/4 turn and line up score line with Score Guide. Score and punch. Continue until all 4 sides are scored and punched. Use corner rounder to punch the top corner (as shown). Add adhesive to hold together as shown and then wrap Bakers Twine around about 3 times and secure tag with knot.  I used about 16" of Twine.

Next was a card using the Blossom Punch.  Instead of punching out a flower to use, we used the piece of card stock with the flower shape removed and revealing the DSP underneath....
Supplies: Blossom Punch (item 125603); Whisper White card stock and Daffodil Delight card stock scrap; Quatrefancy Specialty Designer Paper (item 130141); Daffodil Delight ink pad (item 126944);
1 1/4" Scallop Punch (item 127811); 7/8" Scallop Punch (item 129404); Four You stamp set (item 130538 Clear / 130535 Wood);Rhinestone jewels, Dimensionals, adhesive


We made the one in  Daffodil Delight but you can start with ANY color of DSP that you wish and match your ink to it.  Here it is in Strawberry Slush:


Project 3 was a Birthday Card featuring a stamp set called Really Good Greetings.  I love the sentiment that says "Finally, A day that really is all about You!".  This card has great texture and details! It's yummy!!
Supplies: Coastal Cabana card stock and Whisper White card stock. Strawberry Slush Chevron paper from the Designer Series Paper Stack In Colors (2013 - 2015)  (item 130136); Stamp sets: Really Good Greetings (item 130333 Clear / 130330 Wood) and Flower Shop (item 130942 Clear / 130939 Wood);  Pansy Punch (item 130698); Strawberry Slush ink pad (item 131178); Coastal Cabana ink pad (item 131175); Big Shot (item 113439) and the Perfect Polka Dots Embossing Folder (item 117335);  small scrap of Strawberry Slush card stock and the punch from Itty Bitty Shapes Punch Pack (item 118309);  Ruffle Stretch Trim in Coastal Cabana (item 130024); Pearl basic jewels (item119247) and Adhesive.  Not shown is the inside of card stamped in Coastal Cabana ink with the "Happy Birthday" from  Perfectly Penned (item 122892 Clear / 128703 Wood)

As always, if you have any questions about the projects, the materials, the directions etc. feel free to contact me.  Thanks for stopping by!

Special Promotion: My Paper Pumpkin


The information below is valuable to ALL of you who read my Blog.  But I especially want those of you who are NOT currently in Stamp Club to pay special attention.  My Paper Pumpkin can keep you crafting and enjoying the benefits of "Craft Therapy" even if you don't have time for Stamp Club right now.
Take just 30 minutes a month to escape and do something fun and healthy for yourself!  

Read On...


My Paper Pumpkin Promotion!!


Hi, everyone!  I have some exciting news to share about Stampin' Up!'s monthly subscription program called My Paper Pumpkin.  Now through February 10, sign up for a monthly membership and receive a FREE set of 2012-2014 In Color Stampin' Write Markers - a $14.95 value! 

Need more details about My Paper Pumpkin?  Here you go:

1)  The cost of the monthly membership is $19.95 which includes shipping.  Everything you need to make that month's project is included in the kit.  You'll receive consumables like paper and embellishments PLUS a stamp set to use on many future projects.  It's the perfect way to craft if you don't have a lot of time, money or storage space!

2)  All new subscribers receive the Welcome Kit shown above.  The beauty of the Welcome Kit is that includes a Clear Block D to use with future kits or any stamping project.  The block in and of itself is $8.50 if you were to purchase it separately.

3)  You can even skip a month.  Just go to www.mypaperpumpkin.com and click on "Manage My Pumpkin" and select "Skip A Month" on or before the 10th of the month.  If you miss the 10th deadline, you'll skip the following month.

4)  You can cancel your membership at any time. Again, just go to www.mypaperpumpkin.com and click on "Manage My Pumpkin."

5)  Where do you sign up? Bet you can guess.... www.mypaperpumpkin.com.  You'll be asked if you have a demonstrator.  If you don't mind, please choose ME at this point...Julie Baum {Smile}

Something I would like you to know....  I subscribed to My Paper Pumpkin when it first started, and I nearly cancelled a few months in because there were 1 or 2 projects that have come that I didn't really get excited about. Instead of cancelling, however, I chose to GIVE those kits to a young wife (who I knew didn't have the resources to have her own Paper Pumpkin Subscription, but enjoys crafting.  She LOVED them and was so appreciative! It made her day, and in turn, made mine!   The projects that I've received after that have been some of my favorites!  I'm so glad that I didn't cancel my subscription.

  Check out the adorable kit from November. CLICK HERE     
 I used those cards as Invitations to a small dinner party we hosted!   Remember, you can use the stamps on MANY projects...not just your kit projects.
I hope this is something you will consider!
Julie