We used to call these little folded-paper toys "Cootie Catchers". But you will see in this video, that they call them a "fortune teller". Whatever name you want to use, this little project is soooo cute and would be ideal for a little party favor, a treat for a friend, or a hands-on project for your Workshops (for you demonstrators out there). Besides a Valentines Day project, simply change the DSP (Designer Series Paper) and you can use for ANY party or occasion!!
Ready, Set, Create! I am offering a "$5 off coupon" (to use on your next Stampin' Up! order*) to the first person who sends me a photo of your completed "Cootie Catcher Gift Basket". Please use current Stampin' Up product, and Email your photo to me. I will publish the photo and the name of the winner, here on my blog.
Julie
(*order must be $25 or greater before tax and shipping. Not valid on regular monthly Stamp Club orders.)
Tuesday, December 28, 2010
Filled With Love Promotion

I just ordered mine! You can get the wood mount or the clear mount set.
To order - visit my Online Store or send me an Email.
Monday, December 13, 2010
Message Board - New idea!
In December 2009 we made these cute Message Boards at Stamp Club. They are made with white ceramic tiles (6" x 8") and can be written on using Dry Erase markers. Here is a Christmas version:
 This is the one that sits on my counter the rest of the year...
 Here is the new idea!! In attempt to make alternate toppers for the message board, I decided to add Velcro to the back of the Message board . Then I made other toppers and attached velcro to the ends of these. Voila! To change toppers (seasonly or monthly) simply remove one topper and wrap a new one on to your board!
Here is a photo of the back of the tile with Velcro (hooks) attached:
 Here is a photo of the back of a topper, with the Velcro (loops) attached:
 Topper, being attached to the Velcro:
 View of the back, with topper attached:
 Other toppers:
 Details:
The tiles can be purchased at stores like Home Depot, Lowe's. etc. The easels can be found in many styles at craft or framing stores. The DSP is 2 coordinating pieces, each one measures 1 1/2" x 12". Simply border punch one of them and then attach the 2 strips together with the bottom one showing about 3/4" down. Add ribbon or other embellishments as desired.
Have fun creating!


Here is a photo of the back of the tile with Velcro (hooks) attached:


The tiles can be purchased at stores like Home Depot, Lowe's. etc. The easels can be found in many styles at craft or framing stores. The DSP is 2 coordinating pieces, each one measures 1 1/2" x 12". Simply border punch one of them and then attach the 2 strips together with the bottom one showing about 3/4" down. Add ribbon or other embellishments as desired.
Have fun creating!
Gift Card Holder
This cute gift card holder was first seen on a blog by Patty Bennet. I changed a few things according to what stamps and punches I own.
 It is made up of 2 pieces. One is the card (that holds the gift card) and the other is the sleeve that slides over the card. Here are the 2 pieces separately.
 Here is a photo of the inside of the card (with a fake gift card inserted).
 Details:
The card stock for the Card measures 3 1/4" x 10 ". It gets scored at 4" and 8". When securing the flap for the gift card, be sure to only place Sticky Strip on the very outside edges so that your gift card will fit.
The DSP for the Sleeve measures 3 1/2" x 7 1/2". It is scored at 3 1/2" and 7". Be sure to use your Punch BEFORE you attach any Sticky Strip, or your punch won't fit into the opening. When ready, attach Sticky Strip to the 1/2" flap and seal.
Decorate as desired for any occasion! This one uses Cherry Cobbler card stock, retired DSP, Old Olive and Very Vanilla card stock for accents. Wide Oval Punch and Scallop Oval Punch. 5/8" satin ribbon in Very Vanilla, Glimmer Brads. Old Olive and Versamark ink pads.
Sunday, December 12, 2010
Tea Light Holder
I know you've been waiting for this! I wanted to take the time to shoot new photos and make this tutorial a little more snazzy. But for the sake of time, I will post the basics, and maybe come back later to zip it up!
I originally saw the Tea light Holder at the Pink Buckaroo blog where Erica gave credit to Tanya Boser of Tinkerin-in-Ink and her instructions. So thanks to the inspiration, I gave it a whirl and have done a Fall tealight holder...

And some Christmasy ones in Old Olive and Cherry Cobbler...

And of course the version we made at Stamp Club with Marina Mist, Night of Navy and Bashful Blue snowflakes...

TUTORIAL:
Cut 2 pieces of card stock. One piece will be 8 1/4" x 3 3/4'" This will be the box.
The other piece measures 5" x 6". This will be the sleeve.

If you wish to stamp a design on the Sleeve, you may do it now, or after the Scoring step.
Using a scoring method, score the Box along the long side at:
1/2", 1 1/8", 2 5/8", 3 1/4"
Score along the short side at: 1/2", 1 1/8", 7 1/8", 7 3/4"
Score the Sleeve along the long side only at: 5/8", 2 1/4", 2 7/8", 4 1/2"
Use a bone folder to make crisp creases on all.

On the Box, cut out the "L" shape of each corner as seen here:

You can now begin to assemble the box. Note that there is a snip done with scissors at each of the 4 corners that is not easily seen. It will allow the little flap to fold up and in...
 Fold little square flaps in so that the long sides come up and over them. The sticky strip along the long edge will hold it all together. (shown here is the sticky strip holding down the flap as well as ready to hold down the long edge)
 This is the box with both long edges assembled.
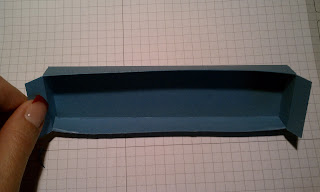 Add Sticky Strip to the short end flaps, and seal shut.
 (If you did not stamp a design on the Sleeve previously, you may do so now.)
Next, add Sticky Strip to the edge of the Sleeve (which you've already scored, and made crisp creases).
 Now the box will slide into the sleeve...
 and should close nicely...

 Have Fun!!
I originally saw the Tea light Holder at the Pink Buckaroo blog where Erica gave credit to Tanya Boser of Tinkerin-in-Ink and her instructions. So thanks to the inspiration, I gave it a whirl and have done a Fall tealight holder...

And some Christmasy ones in Old Olive and Cherry Cobbler...

And of course the version we made at Stamp Club with Marina Mist, Night of Navy and Bashful Blue snowflakes...

TUTORIAL:
Cut 2 pieces of card stock. One piece will be 8 1/4" x 3 3/4'" This will be the box.
The other piece measures 5" x 6". This will be the sleeve.

If you wish to stamp a design on the Sleeve, you may do it now, or after the Scoring step.
Using a scoring method, score the Box along the long side at:
1/2", 1 1/8", 2 5/8", 3 1/4"
Score along the short side at: 1/2", 1 1/8", 7 1/8", 7 3/4"
Score the Sleeve along the long side only at: 5/8", 2 1/4", 2 7/8", 4 1/2"
Use a bone folder to make crisp creases on all.

On the Box, cut out the "L" shape of each corner as seen here:

You can now begin to assemble the box. Note that there is a snip done with scissors at each of the 4 corners that is not easily seen. It will allow the little flap to fold up and in...


Next, add Sticky Strip to the edge of the Sleeve (which you've already scored, and made crisp creases).


Thursday, December 2, 2010
Wrap like a Pro!

You will truly turn your wrapping skills from frumpy into FABULOUS!!
Learn how the pros make bows!
Learn how to add accents that make your gifts look like they were done by professionals!
No skill or experience necessary.
You will leave with 3 packages completely wrapped and all the tips and tricks you need to succeed!
(This class is being held again for those of you who couldn't attend the morning class yesterday.)
You will NOT be disappointed. Please RSVP right away. Space is limited.
Monday, November 22, 2010

HUGE SAVINGS!! 9 days only... SHOP NOW
Get savings of 20%, 30% 40% even 50% on specific items!! It's not often that Stampin' Up! puts on a sale, so take advantage and do some Christmas Shopping for a friend, or maybe a little something for yourself!!
Click on the Shop Now link above to go straight to my online store!!
Monday, November 15, 2010
Soft Suede and Blue - for Christmas too!
While browsing some of my favorite blogs, I stumbled on a Christmas card made with Bashful Blue, Whisper White and Soft Suede. The colors were so calm and elegant that I decided to try it myself. This is the card I designed and we made it at Stamp Club last week:

Bashful Blue card stock
Whisper White card stock
Soft Suede card stock
Northern Flurry embossing folder and Big Shot
Serene Snowflakes stamp set
Snow Swirled stamp set
Bashful Blue ink pad
Soft Suede ink pad
Bashful Blue 5/8" satin ribbon (not currently available) but Whisper White or Early Espresso would work.
Thanks for stopping by!
Julie
Sunday, November 14, 2010
Santa Bottle Topper
My friend and fellow-stamper Sandy Hancock sent this idea to me. I think this makes a wonderful gift to give when you are invited to a dinner party, holiday party or other event where you don't want to show up empty-handed. The cute bottle topper will fit a Sparkling Cider, Wine, Champagne or other similar shaped bottle.

I CASEd her idea and only made very minor changes. Since I did not have the same "For You" stamp, I substituted the "Very Merry" stamp from the Short and Sweet stamp set. I also chose not to stamp it on Santa's beard, but to the side instead. Here is my version:

I think adding a knot made out of Real Red satin ribbon "ties" the whole thing together, don't you?

Here is a peek at what the back of the bottle topper looks like. This is the part that fits over the neck of the bottle.

Santa Bottle Topper Tutorial
This is a photo of all the pieces you will be using:
 |
Start with the large piece of Real Red card stock. It measures 5 1/2" x 4 1/4". (This is a quarter sheet of card stock). Score it at 2 1/2" and fold on scored line.

On the 2 1/2" end, use the 1 3/8" circle punch to make hole. You should center it left-to-right and push it up as far as it will go.

Punch, and it will look like this. Set aside.

Take the Whisper White piece of card stock, that measures 4" x 2 3/4" and place it in the Northern Flurry Embossing Folder as shown. Then run it through your Big Shot.

Stamp the "Very Merry" in black ink on your snowflake piece. Set aside.

Take the Real Red card stock piece that measures 2" x 4" and make a pencil mark at one end, at the center (this will be at 1")

Now cut from the pencil mark down to the opposite end at the corner. And then again from the pencil mark to the opposite end at the other corner. You will end up with a triangle. You can do this with a ruler, pencil and scissors. Or you can use your Paper cutter as shown:


Your triangle should look like this:

Punch all the remaining pieces out. You need:
1 Whisper White Scallop circle (2 3/8")
1 Pink Pirouette Scallop circle (2 3/8")
1 Whisper White Word Window
2 Whisper White circles (3/4")
1 Pink Pirouette circle (1/2")
1 Whisper White circle (1/2")
2 Basic Black circles (1/4") - the Owl punch has "eyes" this size
Next is the assembly of Santa: Fold the white scallop circle in half. Attach to pink scallop circle using SNAIL adhesive. Be sure to carefully match up the scallops.

Attach this to the red triangle. The triangle will become Santa's shirt and hat at the same time.

Next, finish the hat by adding glue and glitter to the Word Window piece and the 1/2" white circle.


Make Santa's moustache. To make this easier, try this trick - stick the 3/4" circles on the sticky part of a Post-It note. This gives you something to hold on to. Then, using the 3/4" circle punch, punch out a "slice" of each circle:

You will be left with 2 little "slices" on your Post It. These are Santa's whiskers. Discard the other pieces that were punched.

Attach moustache, nose and eyes:

Assemble. I used SNAIL adhesive to attach the snowflake background onto red base. I used Sticky Strip to attach Santa.

Last step is very small but makes a BIG difference. Use a white gel pen to make accents on eyes and nose. Then finally, add a rhinestone gem to the snowflake on the right.

You may want to add a knot of Real Red satin ribbon on the neck of the bottle you are using. I seems to finish it well:

Materials List:
Real Red card stock (#102482)
Whisper White card stock (#100730)
Pink Pirouette card stock (#111351)
Basic Black card stock (#119922)
Short and Sweet stamp set (#115060)
Basic Black ink pad (#101179)
1 3/8" circle punch (#119860)
2 3/8" Scallop circle punch (#118874)
Word Window punch (#119857)
3/4" circle punch (#119873)
1/2" circle punch (#229869)
1/4" circle punch (the Two-Step Owl Punch has circles this size) (#119074)
"Northern Flurry" Textured Impressions Embossing Folder (#120902)
Big Shot (#113439)
2 Way Glue Pen (#100425)
Dazzling Diamonds glitter (#102023)
White gel pen (#105021)
Paper cutter (#104152) & Scoring Blade (#104154)
Basic Rhinestones (#119246)
SNAIL Adhesive (#104332)
Sticky Strip (#104294)
Real Red 5/8" satin ribbon (to tie on bottle)
Subscribe to:
Posts (Atom)