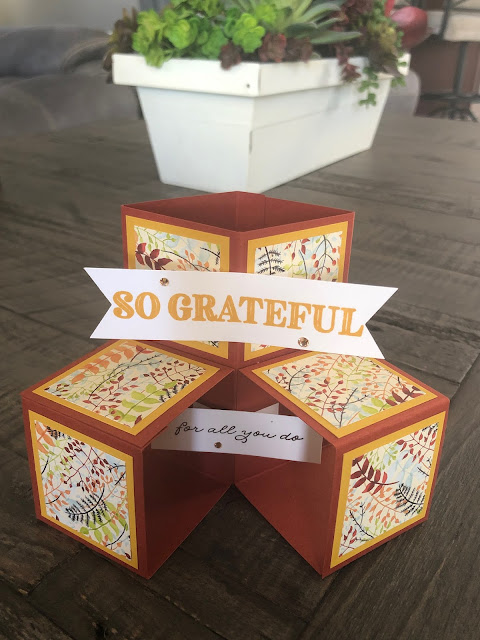
We made a couple of these lovely (and not hard) Cube Cards. This one works as a Thanksgiving card, or any Thank-You card really. I had quite a bit of retired "fall" DSP that we used, but any small print DSP works wonderfully. The second version is the Christmas theme one. Directions are below - and I encourage you to make one of these. They fold flat and fit in *envelopes for mailing, put pop out and sit up in this cool 3-D fashion once they are opened.
Directions and dimensions are below....
Ornate Thanks stamp set #149471 $18 AC 66
Cajun Craze cardstock #119684 $8.75 AC 142
Bumble Bee cardstock #153077 $8.75 AC 143
Whisper White cardstock #100730 $9.75 AC 143
Designer Series Paper – in colors of your choice
Bumble Bee ink pad #153116 $7.5 AC 143
Early Espresso ink pad #147114 $7.5 AC 142
Champagne Rhinestones #151193 $6 AC 156
Stampin’ Seal adhesive #152813 $8 AC 162
Or
Multipurpose Liquid Glue #110755 $4 AC 162
Tear & Tape #138995 $7 AC 162
Simply Scored Scoring Tool #122334 $30 AC 151
OR
Paper Trimmer #152392 $25 AC 151
Start with an 8 1/2" x 8" piece of colored cardstock. On the 8 1/2" side, Score at 2", 4", 6" & 8". Turn and place in trimmer. Cut a 4" strip off and set aside. With the remaining 4" strip, cut it in half (or at 2"). You should now have 3 piece: 1 piece that is 4" x 8 1/2" and 2 pieces that are 2" x 8 1/2".
Reinforce all score lines. Put a strong adhesive on the 1/2" tab of each strip (like Tear & Tape or Seal+). Go ahead and form all 3 boxes.
Using strong adhesive again, attach the 2 smaller boxes to the 1 large box. See photo of finished card, to determine placement. The large box sits upright with its seams going vertically. The smaller boxes are attached to it, side-by-side. Their seams go horizontally.
To make layers on the faces of the cubes, cut a contrasting cardstock into 1 ¾” squares. You'll need 6. And cut 6 smaller squares out of DSP that measure 1 ½” square. Attach layers to the faces of the cubes as pictured.
Stamp and prepare (punch, trip, die cut) any 2 coordinating sentiments for your Cube card. Set aside. Next, prepare the tabs that will hold your sentiments in place: Cut 4 small strips of scrap whisper white cardstock, measuring approx 1/2" x 1 1/2". Score/fold each of these pieces in the middle. At the top of the box, you'll adhere 2 tabs to hold your main greeting, one on each side of the center fold. Do the same for the sentiment inside the folded area. Attach your 2 sentiments to these tabs and finish by adding any bling, gems or other embellishments as desired.
*A word about Envelopes: a typical greeting card envelope in stamping world holds a card that is 4 1/4" x 5 1/2". The envelope measure 4 3/8" x 5 3/4" and in office supply stores are commonly called A-4 or Invitation envelopes. I've also seen them referred to as #5 1/2. The Stampin' Up! envelopes that you can get through me are superior to any that I've used. The finish is smooth and satin-y, unlike any that I've found elsewhere. And they accept our inks SO much better than a cheap, flat, dull envelope.
Buy White Envelopes.
Follow me on Pinterest: Paper Desserts
Shop from my Online Store


No comments:
Post a Comment