The swap theme was the same, and the items were fabulous!! Ladies you are SO creative!
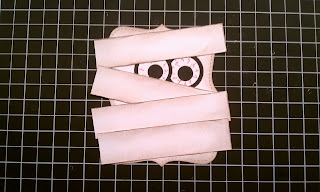
This mummy treat-box was something I found and copied. I believe credit for the design goes to Patti Lee another Stampin' Up! demonstrator. Finished size is 3 3/4" x 4 5/8".
The size of the box portion is 2 7/8" x 4" x 1 1/4".
 |
| All images copyright Stampin' Up! |
You need: (2) top notes (cut with Top Note die) in Whisper White card stock
(2) strips of 1" x 8 1/2" Whisper White card stock
(1) 4" x 1/2" strip Whisper White card stock for knot
(2) 1 1/4" punched circle in Basic Black card stock for eyes
(2) 1" punched circles in Whisper White card stock for eyes
(2) 1/2" punched circles in Basic Black for eyes
To make the Box you need: (1) 8 1/2" x 5 1/4" Whisper White card stock
Score along the 8 1/2" side at 1 1/4". The next section will be 2 7/8", then 1 1/4" again and then 2 7/8" leaving 1/4" at the end. Score along the 5 1/4" side at 1 1/4". See illustration and cut as shown. Remove the tiny 1/4" x 1/4" section at bottom right corner. Crease with bone folder. Assemble box.
Assembled box should look like this.
Distress the edges of all strips. Using a Stamping Sponge and Close To Cocoa ink, sponge around both Top Note pieces as well as all strips.
Using a Real Red Stampin' Marker, create blood-shot eyes as in photo.
Adhere eyes to Top Note front.
Cut long strips into 4 1/4" lengths.
Place strips on Top Note Front as shown. Use SNAIL adhesive to attach.
Turn Top Note over and trim edges of strips.
On the front, sponge the freshly trimmed edges with Stamping Sponge and Close to Cocoa ink
Apply Sticky Strip to the box so you will be able to attach the Top Note front and back.
Last step - tie the 1/4" strip into a knot and attach with a mini Glue Dot.
This little spooky treat is made with the Matchbox Die. We used a variety of paper colors and designs. The box bottom is made out of colored cardstock (Basic Black in this example) and the box top is made out of DSP (retired DSP is shown, but at Club we used the new Wicked Fun DSP). A band of Basic Black 5/8" Satin Ribbon. is wrapped around box and secured with mini glue dots. The little tag is made with Batty for You stamp set (#116576) and punched out with 1 3/8" Circle Punch. A Scallop Circle is punched out of Old Olive card stock and used to back the tag. Googlie Eyes can be added for extra fun!
 |
| All images copyright Stampin' Up! |
Candy Corn inside...
An optional Scary Eye-ball can be attached to inside of box. The eye is attached to a 1/2" x 2" strip of Window Sheet and then attached to inside of box bottom with Sticky Strip. When the box slides open, the eye-ball pops out!!
This project was made by me, but with inspiration from both Patti Lee and Patty Bennett.
Here is the Fall/Thanksgiving card we made:
 |
| All images copyright Stampin' Up! |
These products are all available through my Online Store. Or email me if you have questions or need my help!
Thanks for dropping in!
Julie


No comments:
Post a Comment