Follow me on Pinterest

Monday, August 13, 2012

Stamp Club August 2012


Here are 3 projects that we made last week at Stamp Club!
This cute card* is made with the Summer Silhouettes stamp set which is becoming a huge favorite! The border on the Calypso Coral cardstock is made using the Framed Tulips Folder (for Big Shot).
DSP (retired) in a Wisteria Wonder pattern, and the Wisteria Wonder Ruffled Ribbon make it pop!
Colors: Calypso Coral, Wisteria Wonder, Lucky Limeade.

*summer silhouettes card layout was CASED from another site and then altered to suit.

It's not too early for Halloween projects!  It will be here before you know it.
This card features the Bootiful Occasions stamp set. Note the little piece of patterned paper from Howlstooth & Herringbone DSP! The Basic Gray card stock base has vertical stripes for texture (Stripes Folder for Big Shot) and the black cut out behind the boot is made with Labels Collection Framelits (for Big Shot) and added texture from Vintage Wallpaper Folder (Big Shot).  A knotted piece of 1/4" Stitched grosgrain ribbon in Basic Gray is attached with some Sticky Strip. Finally the boot is embellished with Rhinestone Basic Jewels for a little *Bling*.
Colors: Basic Black, Pumpkin Pie, Basic Gray, Whisper White card stock


A Halloween basket is simple using the Simply Scored tool. My basket is made with Eggplant Envy card stock, Eggplant Envy DSP and features the new Googly Ghouls stamp set. Of course the goolie eyes are a must! Instructions for Basket are below, shown on a piece of Basic Black card stock.


Card stock measures 8 1/2" x 7 1/2".  Lay cardstock lengthwise on Simply Scored and score at 1", 2", 3" 5 1/2", 6 1/2" and 7 1/2" as shown:


Then turn 1/4 turn and score at 2 1/2" and 5" as shown:

 With scissors -Snip all the little strips up to the score line that they intersect as shown:


Find the center of the larger section and mark with pencil. Next draw lines from the top corner of that section, down to your center mark (just outside of mark is better):


You will do that same step on the opposite side as well.  And then remove the triangle portions that you've marked (4 in all):
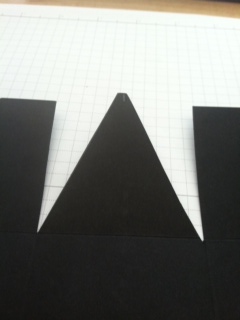


Now assemble the sides: keep the triangle portion on the outside of the basket and gather up the sides alternating right/left/right/left until they are all gathered behind the triangle as shown:


 At this point you can use staples to secure it.  Or if you prefer you can punch holes and run a brad through it.  We added a handle (1" wide card stock plus a 3/4" strip of DSP for decoration).  Assembly was completely done with staples because the little witch covers staples on one side, and strategic placement of handle and staples finishes the other side.


Thanks for stopping by.  Happy Stamping!


Thursday, July 12, 2012

It's my Birthday!!

Today is my birthday!  It has been so fun having Stamp Club on my birthday!  It's like  having a party where all your friends come and stamp!  Thank you for all the wonderful wishes.  I am blessed having you in my life.
Below are the 3 samples from club this month (July).
First up:  A Birthday favor - for everyone to make and take home!  This is made with Crumb Cake, Early Espresso and Gumball Green ink. Stamp sets: It's A Wrap Occasions, and Create a Cupcake.  Extras include International Bazaar DSP and Word Window punch and Cupcake Builder punch.
Next is a card with the new Summer Silhouettes stamp set.  I'm quite sure that I CASED this from someone - not my original design.  I love the Raspberry Ripple (new In Color) ink and the new stitched grosgrain ribbon in Daffodil Delight!

Lastly is this very happy-feeling card. Calypso Coral, Gumball Green and Basic Black ink. Stamp sets: Betsy's Blossoms and Made for You. The little piece of DSP is from Summer Smooches and the card stock is Whisper White, Calypso Coral and Daffodil Delight. Extras include Dotted Scallop Ribbon Border, Designer Buttons (misc), Calypso Coral Baker's Twine and of course some rhinestone bling!! This card was also CASED from another source.
Thanks again for stopping by on my birthday! Hugs!!
Julie
I finally re-made the card sample from June Stamp Club (the one that Kozmo was chewing on).  Here it is!  Made with the new Summer Silhouettes stamp set (love it!) and also some new In Color colors including Gumball Green, Midnight Muse and Summer Starfruit.
Thanks for your patience!

Wednesday, May 16, 2012

Projects from Stamp Club

These are the 3 projects we made in Stamp Club this month.
The first card made in neutrals colors of Crumb Cake, Early Espresso and Very Vanilla was made with the Mixed Bunch stamp set (featured in Occasions Mini Catalog but still available) and the coordinating Blossom Punch.  Gotta love these!! (looks better in person - I'm no photographer!)
Crumb Cake seam binding, and Framed Tulips also noteworthy!

This second card, made in Daffodil Delight, Island Indigo, Rich Razzleberry, Real Red, and Lucky Limeade features a set that is coming in the new catalog called: Bright Blossoms and has a coordinating DSP called  Summer Smooches.

"thank you" stamp is from Teeny Tiny Wishes

Our third project was this Oh-So-Darling Purse!! Credit to Sandy Hancock for sending me a sample of this.  The Top Note die (for Big Shot) is used and most of the scoring can be done on the Simply Scored tool and the Diagonal Plate. Start with 12x12 card stock for this size. 
Melon Mambo / Wisteria Wonder
can hold several small treats or gift cards easily

Velcro dot allows repeated opening and closing
Please contact me if you have any questions about any of these projects or Stampin' Up! products!
Julie

Monday, May 14, 2012

Sale! Up to 80% off Stamp Sets!!

Stamp sets up to 80% off!! It's true, I am having a HUGE SALE!

Call it Spring Fever or whatever you like...but the time has come to clear out again and make room for the many new and wonderful sets that are being unveiled next month in the 2012-2013 Stampin' Up Catalog!!

Smaller sets are $5 each.  Larger sets are $10/$15 each.  But to make things easier...
All sets are $5 when you buy 4 sets! That's 4 sets for $20!! 
I am selling over 50 Stamp Sets!! (wood and clear mount)
I also have a large box of stamps for $1 each!!

NOTE: Not all sets are pictured. I have more sets that won't retire until the end of this month, so I am not free to advertise or sell those yet.  Please ask me about these sets.

Starting today, you can shop from your computer/phone! Check out the photos below and email or text me what sets you want to buy and I will put them aside for you until Saturday  (or another day this week). Anything left over will be available for viewing and for sale this Saturday May 19 from 4:00 - 7:00pm only. 

For ease in identifying: Sets are numbered Top Left to Right Top and Bottom Left to Right.
Need to see something more clear? Text/email me and I will send a close-up photo to you.

 
sold, sold, sold, sold

Sold, sold, sold, sold
Sold, Sold, Sold, Sold


Sets 13, Sold, sold, 16


 sold, 18, 19, Sold, Sold

Sets 22, Sold, 24, Sold


Sold, Sold, 28, 29


Sold, sold, Sold, 33


Sets 34, 35, sold, sold, 38
Sold,40, sold, sold ,sold,SOLD


$1 Each


Tuesday, May 1, 2012

Cheery Card for a gloomy day

We've got a bit of early "June Gloom" in southern California today. Not sure if the sun is gonna break through the the heavy marine layer or not...
So here is a cherry little card to brighten up the day!

Made with the new Bright Blossoms stamp set (will be available next month in the new catalog), along with the coordinating Designer Series Paper.  Also featured is the oval frame from Designer Frames (a Textured Embossing Folder set of 2) for Big Shot. Notice the delicate lattice impression on the Top Note?  This was created in a SNAP with the new Simple Scored Diagonal Plate!

Thanks for stopping by!


Sunday, April 15, 2012

Stamp Club review

Had a great time with all my Stamp Club gals on Thursday!  We used the new Simply Scored Diagonal plate to make a "love note size" envelope in Lucky Limeade.  It goes great with our "love note" sized card in Lucky Limeade and Tempting Turquoise.  We used the "rock and roll" technique on the flower.  That flower is from the Mixed Bunch stamp set.
Note the little envelopes in the background - those are made with DSP!  Super cute!!

We also made this elegant card on Basic Gray card stock.  We learned how to do the Versa-Shadow technique by stamping image in Whisper White ink first, then outlining it with a Versamarker. Pop!!

Our final project was this "Happy Day to you" card.  It features the new Bright Blossoms stamp set  And that fabulous DSP is called Summer Smooches! Both of these items (and others) are currently on a sneak peek promotion for April - but will appear in the upcoming, new catalog!

Thanks for stopping by!

Tuesday, November 15, 2011

Tiny Triangle Box


I saw this darling little box on Wendy Wexler's blog and had to try it! Start with a 6" x 6" piece of DSP or cardstock.

Score at 2" and 4"...

Turn paper 1/4 turn and score again at 2" and 4"...

Go ahead and crease those folds as "valley" folds...

Now you will need a pencil and ruler.  On the "wrong" side of the paper, mark small Xs where your four corners intersect...

Then, on 2 opposite sides you will make a pencil mark at 3"...

Set pencil aside.  Using ruler and stylus, (you can use your Simply Scored tool for this, but diagonals are tricky.  It was faster for me to show it this way) you are going to score the 4 corners diagonally.  Lay your ruler from corner to corner as shown...

now score from the corner to the X mark  DO NOT score all the way through the center!! Only score the corners to the X marks.  Do this on all 4 corners. ...

 Next, fold those four corners into "mountain" folds...

 This is what it should look like at this point....

Next you will make score lines on those 2 sides with pencil marks.  You need to line up your ruler on the X and that 3" pencil mark you made earlier...

In that SAME area, score from the other X to the pencil mark.  You will have scored a V-shape from the X marks to the pencil mark.  Make "mountain" fold out of these...

Press your paper down gently so that the original "valley folds" give way and your paper looks like this...

 Now you can gently bring the sides towards each other. The sides look like Ws...

Continue to bring everything to the center.  It will begin to "go together".  Just let the flaps go where they tend to want to go...

You may need to try "right flap over left flap" or vice versa to get it to go together without being crooked...
Here is the side view...

Take the 2" x 4" piece of coordinating cardstock and attach it to the back, flat part of triangle...

This shows how the the front flap will go...

 Decorate the front flap...

A piece of velcro makes a nice way to finish it, so that it can be opened and shut repeatedly...
This little triangle box will hold 3 Hershey's kisses,  or 2 Dove Promises.  I'm sure it will hold a handful of M&Ms, jelly bellys or any other little treat!!
Enjoy!