
My example below is made with: Chocolate Chip card stock for the base, “Sweater Weather” DSP, card stock pieces in Soft Sky, Tangerine Tango, Sahara Sand, Chocolate Chip, and Crushed Curry. My letters are from very vanilla cardstock. Punches used: 1 ¼’ circle, 1 3/8” circle, Tab punch (retired), Boho Blossoms, Itty Bitty Shapes Punch pack. Other embellishments: ribbon scraps in coordinating colors, rhinestone jewels, Candy Dots.
You will
need:
Colored Cardstock for Base (2 pieces measuring 4 ¼” x 11”
and 1 piece measuring 4 ¼” x 6 ½”.)
Designer Series Paper, variety of prints (8 pieces total;
each measuring 3”x4”)
Colored card stock (8
pieces total; each measuring 2” x 2 ½” that coordinate with your DSP) plus
scraps.
White or Vanilla
Cardstock (depending on what coordinates best with your DSP.)
*Letters spelling GRATEFUL – each should measure between 1 ¾” tall and 2 ½” max.
Stamps, ink, punches, ribbon etc. for embellishments.
(My letters were made with a Big Shot alphabet die that is no longer available through Stampin’ Up. The current one offered on page 192 makes smaller letters, only 1 ¼” high. So I recommend that you find letters that are the right size whether those are stickers, or die cuts from another source.)
Supplies:

1. Score both of the long card stock pieces at 3 ¼”, 6 ½” and 9 ¾”:

2. Score the short
piece at 3 ¼”:


4. Place a generous amount of strong adhesive on the smallest section of your long card stock pieces:

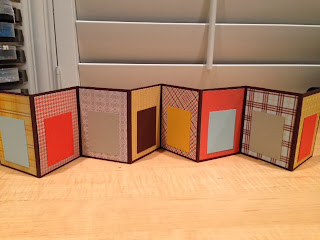
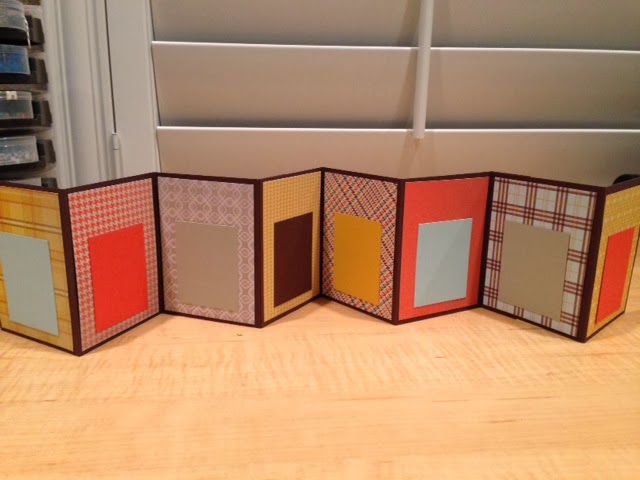
5. Attach the first 2 pieces (long ones) to each other. Then attach the short piece to it to make one long accordion-folded strip:
 The
seams will be on the back of your project
The
seams will be on the back of your project


1 3.
Fold accordion style along score lines that you
made:

4. Place a generous amount of strong adhesive on the smallest section of your long card stock pieces:

5. Attach the first 2 pieces (long ones) to each other. Then attach the short piece to it to make one long accordion-folded strip:


1 6. Attach colored card stock pieces to coordinating
DSP pieces:

1 7. Attach these to the base:
1 8. Attach letters:
*

1 9. Decorate using punches, stamps, ink, ribbon
& embellishments.

No comments:
Post a Comment