Monday, August 13, 2012
Stamp Club August 2012
Here are 3 projects that we made last week at Stamp Club!
This cute card* is made with the Summer Silhouettes stamp set which is becoming a huge favorite! The border on the Calypso Coral cardstock is made using the Framed Tulips Folder (for Big Shot).
DSP (retired) in a Wisteria Wonder pattern, and the Wisteria Wonder Ruffled Ribbon make it pop!
Colors: Calypso Coral, Wisteria Wonder, Lucky Limeade.
*summer silhouettes card layout was CASED from another site and then altered to suit.
It's not too early for Halloween projects! It will be here before you know it.
This card features the Bootiful Occasions stamp set. Note the little piece of patterned paper from Howlstooth & Herringbone DSP! The Basic Gray card stock base has vertical stripes for texture (Stripes Folder for Big Shot) and the black cut out behind the boot is made with Labels Collection Framelits (for Big Shot) and added texture from Vintage Wallpaper Folder (Big Shot). A knotted piece of 1/4" Stitched grosgrain ribbon in Basic Gray is attached with some Sticky Strip. Finally the boot is embellished with Rhinestone Basic Jewels for a little *Bling*.
Colors: Basic Black, Pumpkin Pie, Basic Gray, Whisper White card stock
A Halloween basket is simple using the Simply Scored tool. My basket is made with Eggplant Envy card stock, Eggplant Envy DSP and features the new Googly Ghouls stamp set. Of course the goolie eyes are a must! Instructions for Basket are below, shown on a piece of Basic Black card stock.
Card stock measures 8 1/2" x 7 1/2". Lay cardstock lengthwise on Simply Scored and score at 1", 2", 3" 5 1/2", 6 1/2" and 7 1/2" as shown:
Then turn 1/4 turn and score at 2 1/2" and 5" as shown:
With scissors -Snip all the little strips up to the score line that they intersect as shown:
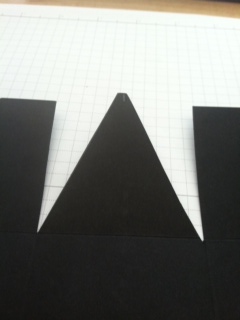
Find the center of the larger section and mark with pencil. Next draw lines from the top corner of that section, down to your center mark (just outside of mark is better):
You will do that same step on the opposite side as well. And then remove the triangle portions that you've marked (4 in all):
Now assemble the sides: keep the triangle portion on the outside of the basket and gather up the sides alternating right/left/right/left until they are all gathered behind the triangle as shown:
At this point you can use staples to secure it. Or if you prefer you can punch holes and run a brad through it. We added a handle (1" wide card stock plus a 3/4" strip of DSP for decoration). Assembly was completely done with staples because the little witch covers staples on one side, and strategic placement of handle and staples finishes the other side.
Thanks for stopping by. Happy Stamping!
Subscribe to:
Comments (Atom)


